Setting up DNSKong 1.0.5 on Windows 2000First you need to know this is not necessarily an easy task. You need to be able to change Network properties and you should feel confident when editing your registry. You should also be able to manage Windows 2000 services. If you are the least bit uncomfortable about any of these things, then you need to look for something other than DNSKong. First, a recap of what DNSKong does. DNSKong is a limited, personal, localhost-only caching pseudo Domain Name Server. It runs as a program on your machine that has a tray-icon interface. Ordinary use of DNSKong is in invisible mode where the tray icon is not seen. You may use the installed Start Menu to see the tray icon and control other facits of DNSKong. To run DNSKong you need to tell your computer that it can use the DNSKong server. This is done by placing an IP entry into your TCP/IP internet protocol settings. Your machine needs to know that the address 127.0.0.1 is a DNS server and that it is the first one to be checked. On all Windows operating systems except for Windows 2000 this is easy. Windows 2000 also includes a service known as the DNS cache. You can locate it in your services listed as "DNS Client". To use Hosts or DNSKong you may need to stop and disable this service. Some machines seem to run Hosts without disabling this service. It is safe to turn it off and disable it. You will likely never notice it is gone. As far as I can tell, no other Windows operating system offers such a service. Disclaimer: The steps below document a success rather than a tried and true process. Now to the details. By far the easiest way to set you machine to use 127.0.0.1 is to use the registry. This may actually be your only option. I'll cover it first by using the following graphic:
Notice the registry path starts with: HKEY_LOCAL_MACHINE\SYSTEM\CurrentControlSet\Services\Tcpip\Parameters\Interfaces\ Also notice the entry in the {} of the registry and that the graphic shows other such entries. Look in each entry in your Interfaces to locate the NameServer entry. Your registry will have several DNS servers listed. Edit the NameServer String and add 127.0.0.1, to the beginning of the string. Note that the remaining DNS server IP addresses in the above graphic will not work, in fact some of the above IP addresses to not fall into valid IP address ranges. Exit the registry editor. You have now set the proper entry for the DNSKong server. Note the Install program for DNSKong does not even attempt to set this value for you. That would be poor form. Next for the more graphic oriented, it may be possible to set the server entry via dialogs. Look in Network Neighborhood Properties, you should see:
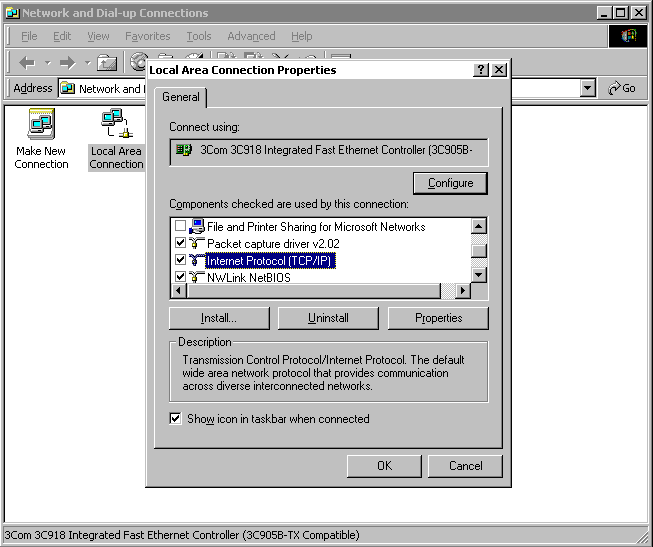
In the above graphic, the Local Area network properties have been selected. That shows the machine is connected to the internet using a network card. The graphic also shows the Internet (TCP/IP) protocol is selected. Repeat the above steps on your computer and then click the Properties button. Then locate the Advanced Button on resulting dialog. You should now see a graphic similar to:
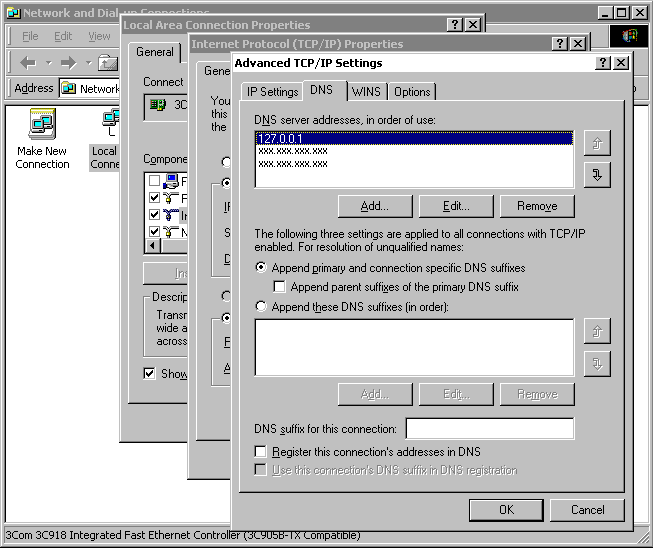
The above shows the Advanced Properties with the DNS tab selected. Click add and enter 127.0.0.1 as a new DNS Server. You should be able to move this entry to the top of the DNS Server list. Click OK on each dialog in order to exit the Internet (TCP/IP) protocols. In all the above cases, it is a good idea to reboot your computer after making these changes.
|


